
App Help Guide
A guide to using Track My Wealth on your phone. This is the guide the app itself links to — it's a separate document from the browser app's own Help page, since some workflows and features differ between the two. The pictures show the app in English; your app shows the same screens in your chosen language, and the numbers in each picture match the list underneath it.
Last updated: 1 October 2026
1. Signing in and creating your account
Signing in
Open the app and enter the email and password you use for Track My Wealth. Tap Show beside the password to check what you typed (it becomes Hide), then tap Sign in. If you've forgotten your password, tap Forgot password? below the Sign in button and we'll email you a reset link.
Once you've turned on Face ID sign-in (see section 13), you can tap Sign in with Face ID instead of typing your password. If Face ID can't verify you, just sign in with your password.
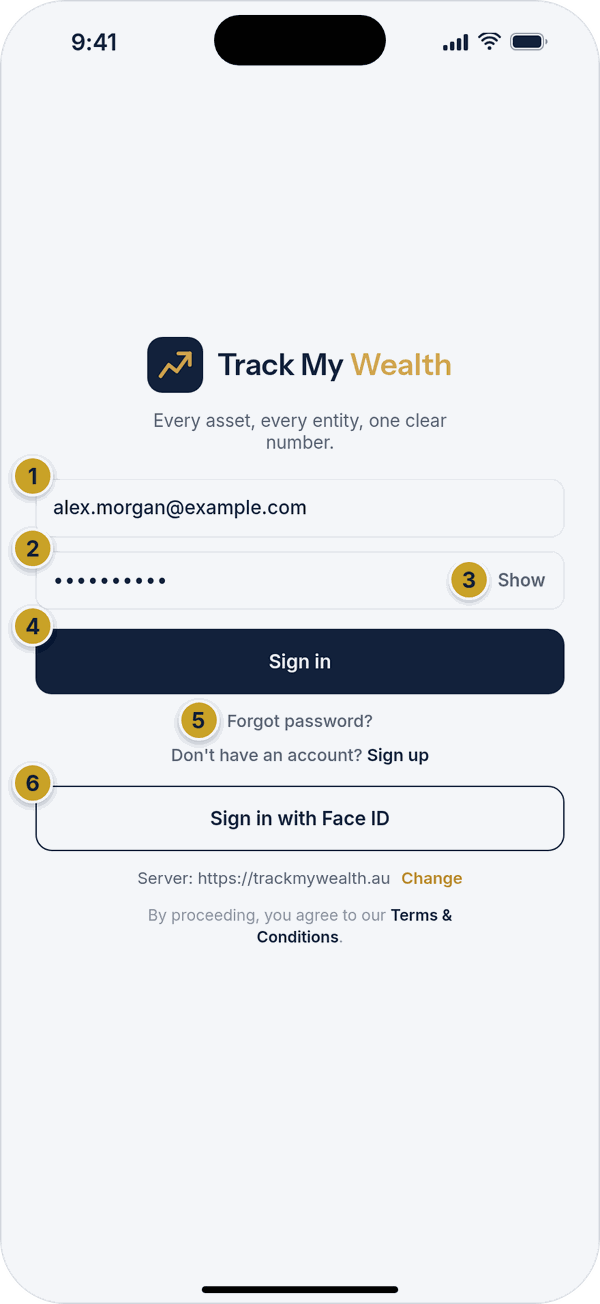 Sign-in screenEmailPasswordShow or hide the passwordSign in buttonForgot password? linkSign in with Face ID
Two-factor code at sign-in
If you've turned on two-factor authentication (see section 13), you'll be asked for a 6-digit code from your authenticator app — or one of your backup codes — after entering your password.
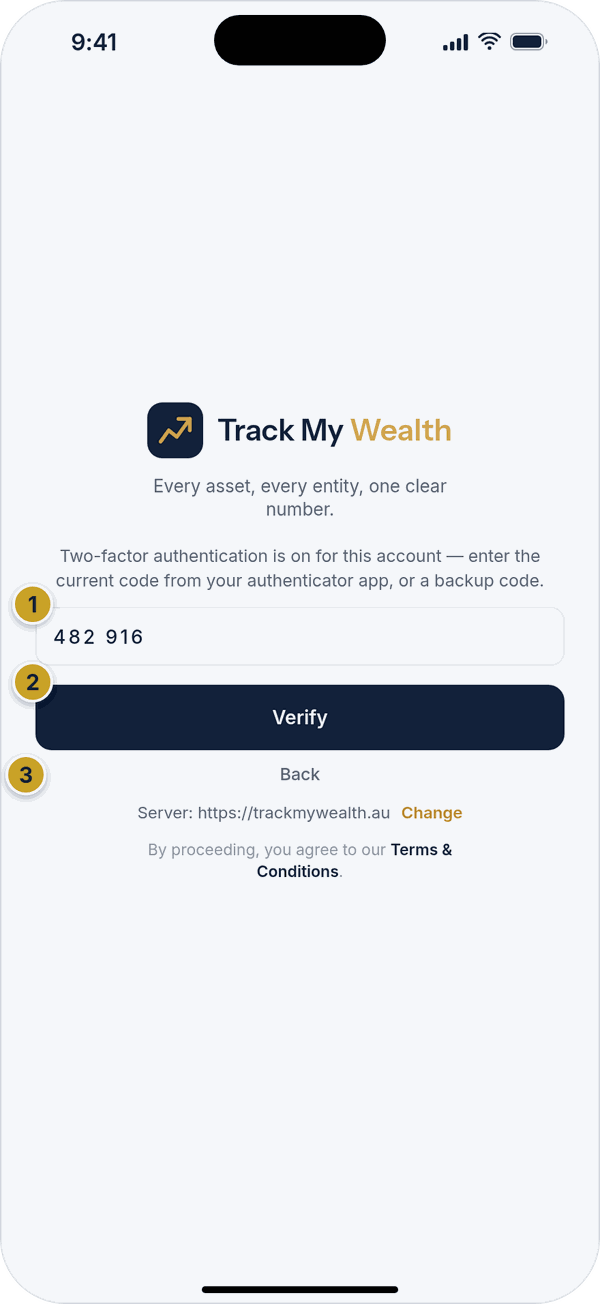 Two-factor code entryAuthenticator or backup codeVerify buttonBack link
Creating an account
Tap Sign up from the sign-in screen. Enter your name (optional), email, and a password of at least 8 characters, then confirm the password and tap Create account. Your email is your username — you'll use it to sign in from now on.
After you sign up, we'll send a confirmation link to your email address. Open that email and tap the link to activate your account, then come back to the app and sign in. If you don't see the email, use Resend confirmation email on the "Check your email" screen.
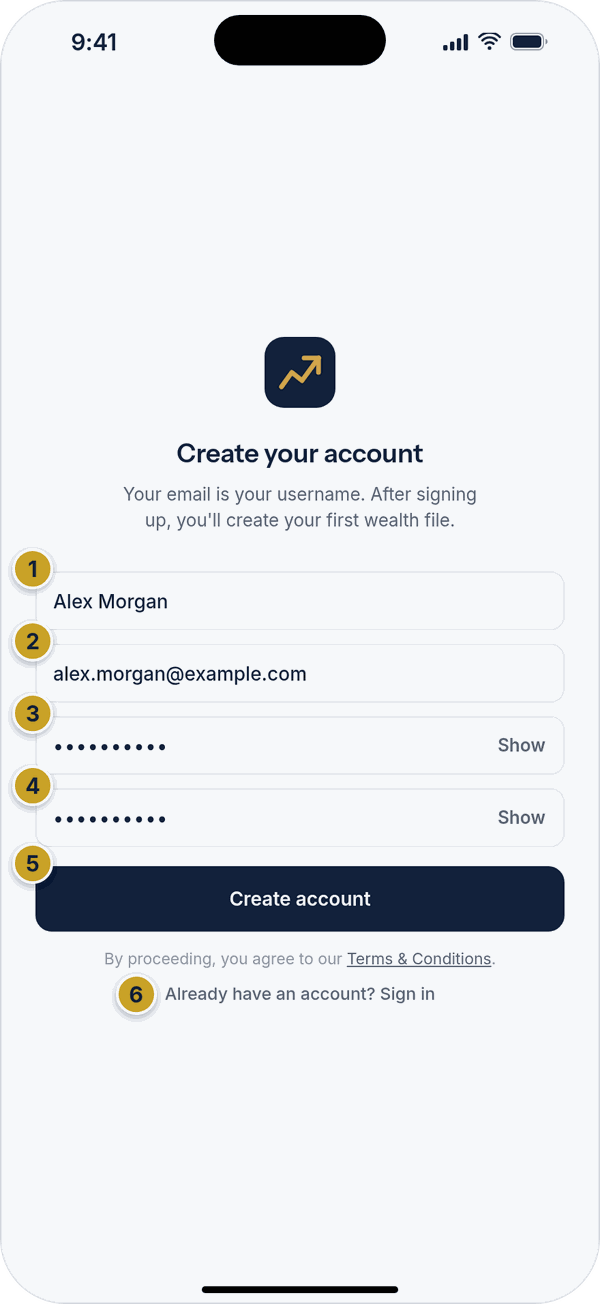 Create your accountName (optional)EmailPasswordConfirm passwordCreate account buttonAlready have an account? Sign in
Once you're signed in for the first time, you'll be guided to create your first wealth file — this is where everything you own and owe gets tracked. You can read the Terms & Conditions at any time from the link at the bottom of the sign-in screen.
2. The four tabs and your Home screen
The bar at the bottom of the app has four tabs — Home, Overview, Files and Settings. Every account sees the same four tabs, whatever type of account you have.
The first time you open the app
With no wealth files yet, Home shows a "Welcome aboard" card with a short explanation and a + Create your first wealth file button. It's free, no card required, and you can add, edit or remove anything later.
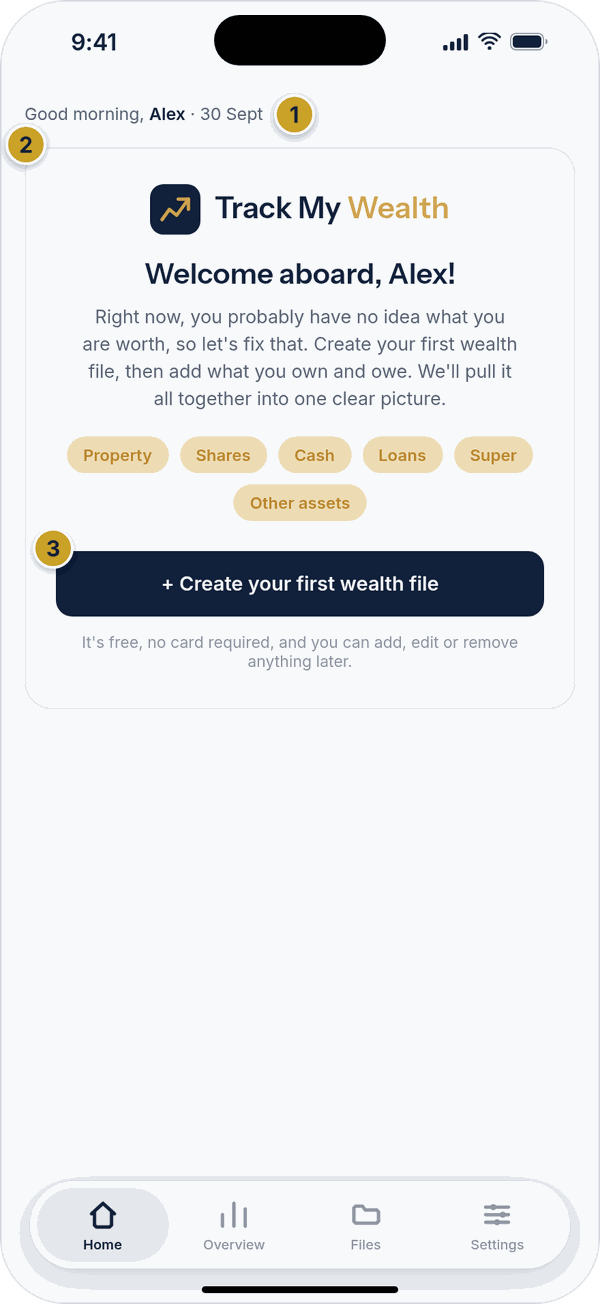 Home tab for a new accountGreeting lineWelcome cardCreate your first wealth file button
Once you have at least one wealth file
Home shows a "Total net worth" card with your combined figure and how much it's changed this month, a + New wealth file button, and a card for each of your wealth files underneath — tap any one to open it.
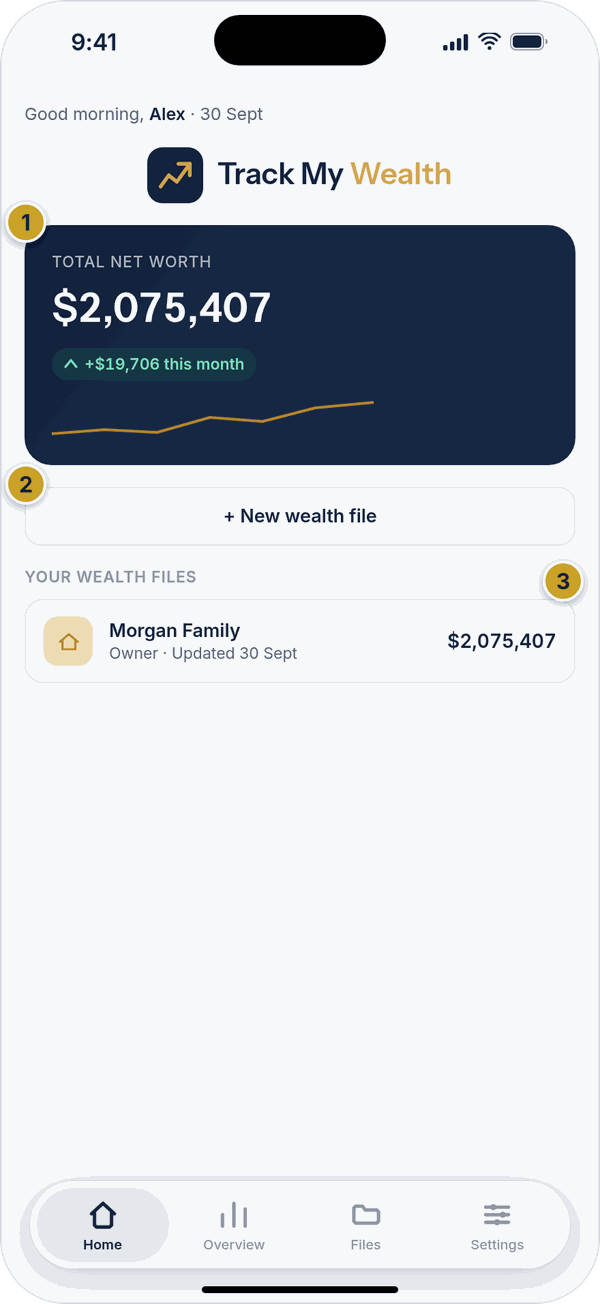 Home tab with a wealth fileTotal net worth card+ New wealth file buttonWealth file card
Light and dark appearance
The app follows your phone's light or dark setting by default. You can also choose Light or Dark yourself in Settings (see section 13).
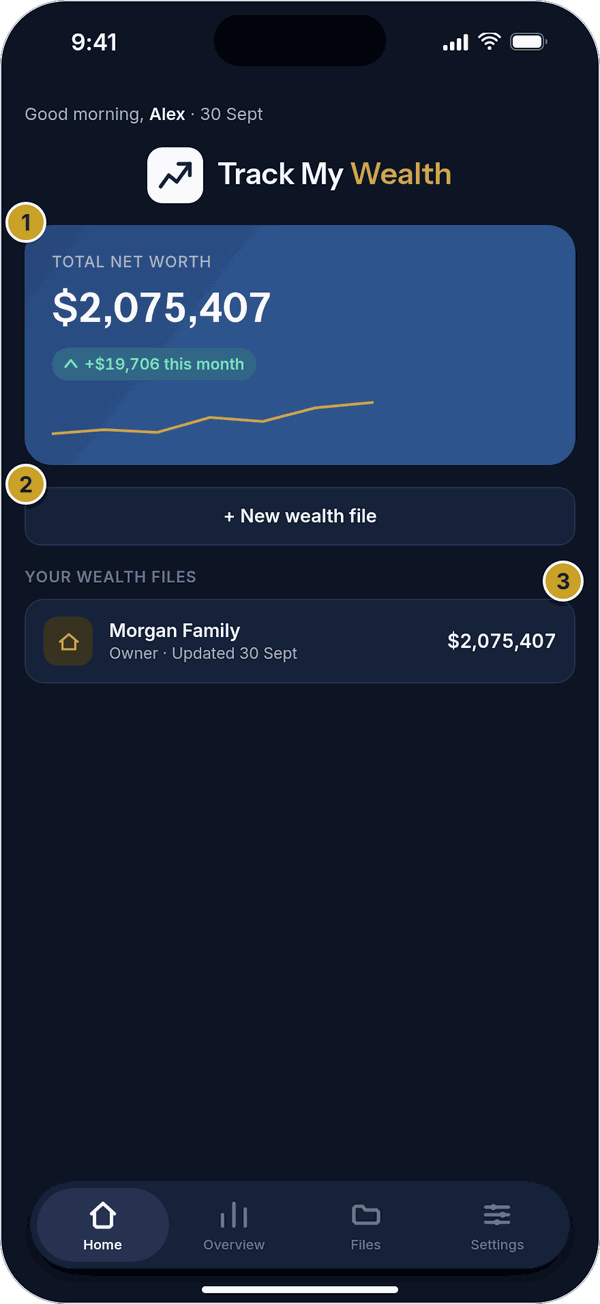 Home tab in dark modeTotal net worth card+ New wealth file buttonWealth file card
If you manage other people's files (power users and admins)
If your account can manage other people's wealth files — for example if you're a financial adviser or accountant with clients on the platform — Home instead shows your own file separately from a searchable "Your clients" list, plus buttons to + Create client or + Add wealth file. Super admin accounts additionally see a couple of platform-wide stat tiles here (Users, Active wealth files) and recent-signup and complimentary-access summaries — this part of the app is for Track My Wealth's own support team. See section 15 for managing clients.
3. The Overview tab
Overview shows your combined net worth across every wealth file you can see. Tap 1M, 3M, 6M, 1Y or All to change the time range of the trend chart and the change figure. Below the chart, a tile for each category shows its total, its share of your wealth and how it has changed.
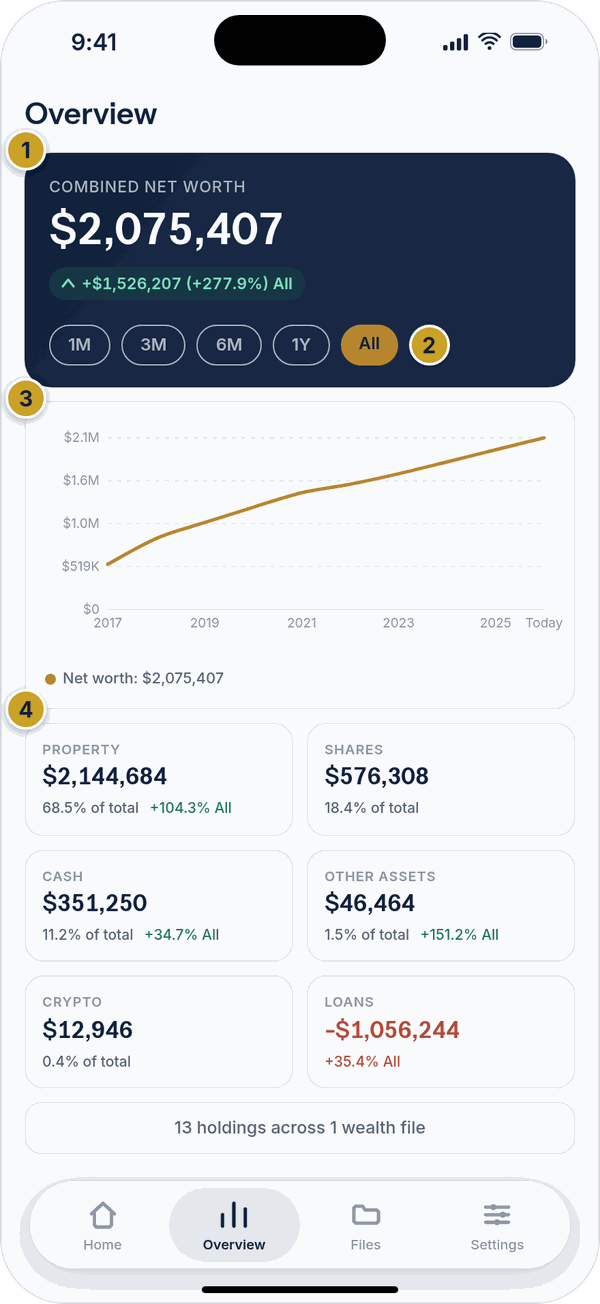 Overview tabCombined net worth cardTime range chipsNet worth trend chartCategory tile
4. Your Files
The Files tab lists every wealth file you can see — your own, plus any shared with you or that you manage. A file that isn't yours shows who shared it and what level of access you have (Owner, Manager, Editor or Viewer). Tap a file to open it.
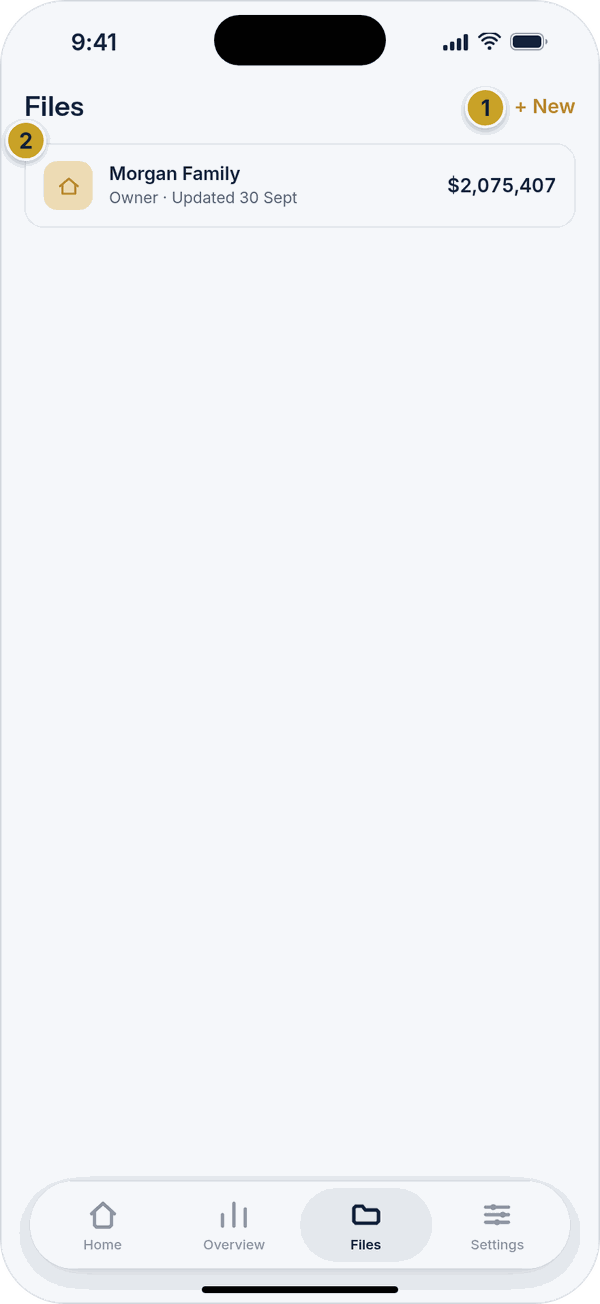 Files tab+ New buttonWealth file card
Creating a new wealth file
Tap + New (or + Add, if you manage other people's files). Give the file a name — a nickname like "Family finances" or "SMSF" helps if you'll have more than one — and tap Create wealth file. It starts completely empty.
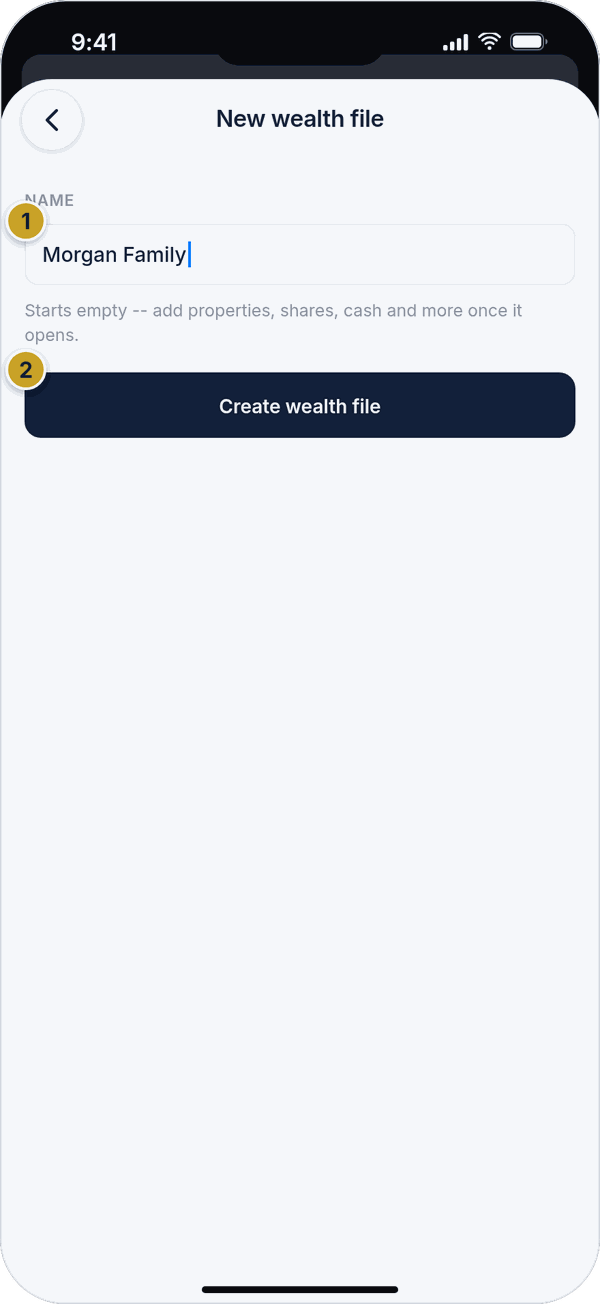 New wealth fileName fieldCreate wealth file button
Renaming or deleting a wealth file
To rename a file, open it, go to its Settings screen, and change the "Wealth file name" field — it saves automatically. To delete one, open it, tap the ⋯ menu in the top corner, then Delete wealth file. A deleted file can be restored within 30 days; after that it's gone for good. Everyone it was shared with loses access immediately.
5. Opening a wealth file
Tapping a wealth file opens it to a header showing its name and current net worth. At the bottom, a switch moves between two views: Overview and Holdings. If you only have view access to a file, you'll see a "View only" note instead of the usual edit tools.
Holdings view
Holdings lists your entries. Under the header are three quick-action buttons — Insights, Settings and Cash flow — then a row of category chips, then the entries for the category you've chosen. The gold + button adds a new entry. The ⋯ menu at the top right holds the file's other options (see "The file menu" below).
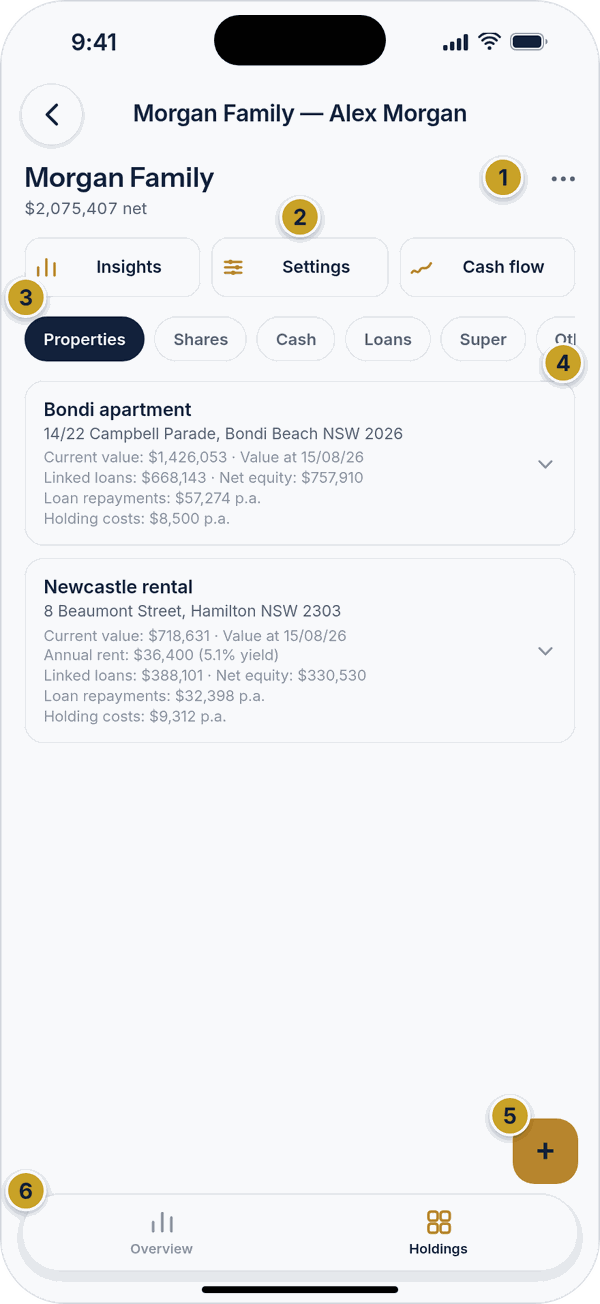 Wealth file, Holdings viewFile options (⋯) menuInsights, Settings and Cash flow buttonsCategory chipsProperty entryAdd (+) buttonOverview and Holdings switch
Swipe left and right across the entries area, or tap a chip, to move between the ten categories: Properties, Shares, Cash, Loans, Super, Other assets, Crypto, Income, Goals and Insurance. Which categories you see, and in what order, can be changed for every file you own from that file's Settings screen (see section 7).
Overview view
Overview shows this one file's net worth, the time range chips, the trend chart and a tile for each category, in the same way as the Overview tab does for all your files together.
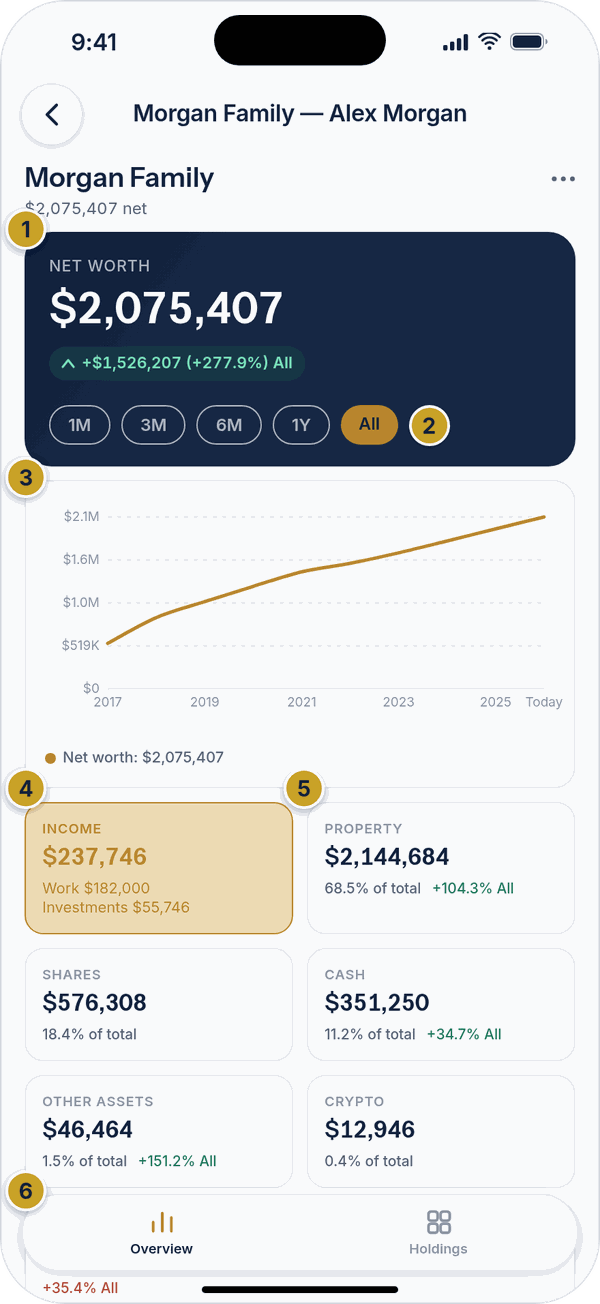 Wealth file, Overview viewNet worth cardTime range chipsNet worth trend chartIncome tileCategory tileOverview and Holdings switch
Viewing an entry
Properties, shares, cash, loans, super funds, other assets and crypto holdings can be tapped to expand in place, showing extra detail before you commit to editing:
- Properties always show a short summary underneath — current value and the date it's as of, annual rent and yield, any linked loan balance and your resulting net equity, and loan repayments — even before you tap to expand.
- Properties, shares, crypto and loans show a value-over-time chart when expanded — properties and loans show a forward growth projection, while shares and crypto show their real price history instead.
- Properties, shares and crypto also show an editable yearly valuation table when expanded, so you can enter a known value for a specific past year rather than relying on the estimate.
- Cash and other assets show that same editable yearly valuation table, without a chart.
- Super funds show a breakdown of every asset and loan you've tagged to that fund, with a net total.
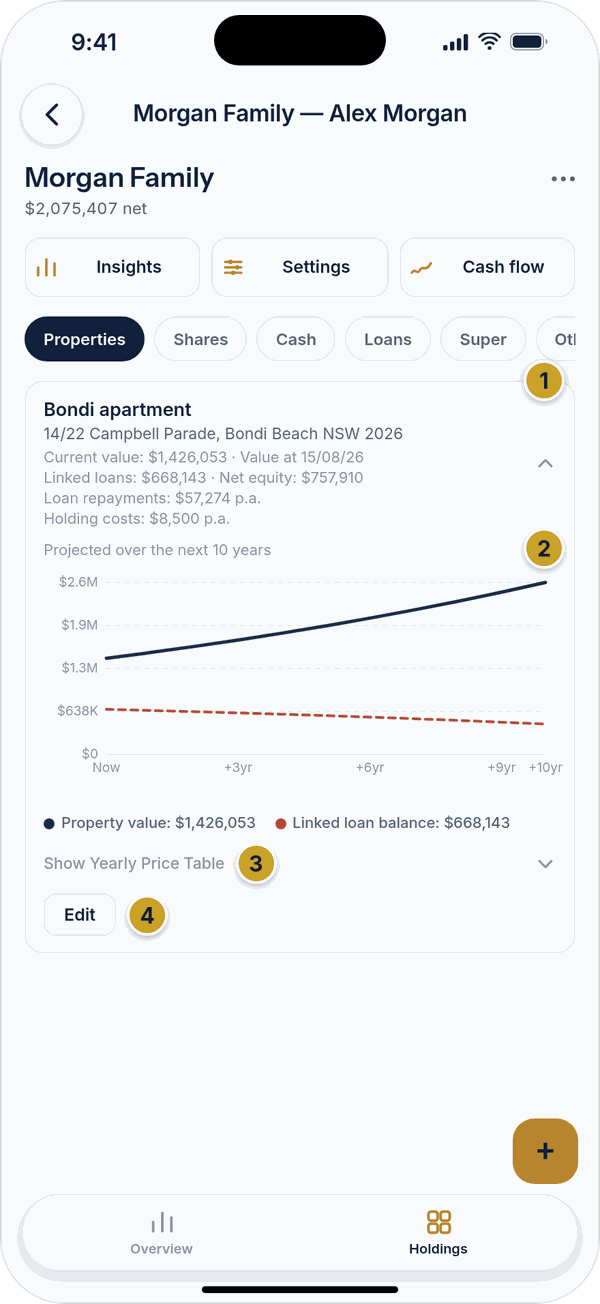 An expanded property entryEntry header (tap to collapse)Ten-year projection chart with the linked loanShow yearly price tableEdit button
Income, goals and insurance entries are simpler — tap one to go straight to its edit screen.
Adding, editing and saving
Tap the gold + button to add a new entry to whichever category you're viewing. Tap Edit inside an expanded entry (or tap a plain row) to change it. Nothing is stored until you tap Save changes. Cancel leaves the entry exactly as it was, and Delete removes it.
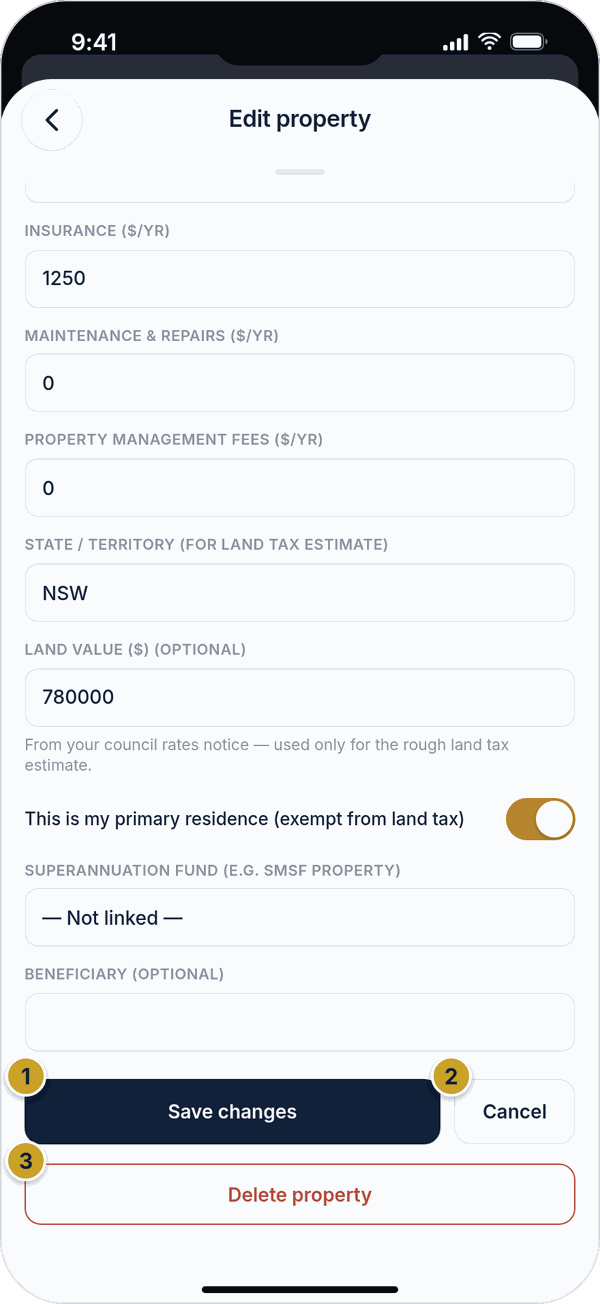 Editing a propertySave changes buttonCancel buttonDelete property button
If you try to leave a screen with something unsaved, you'll be asked whether to keep editing, save what you've entered, or discard it — so a stray back-swipe never silently throws away your work.
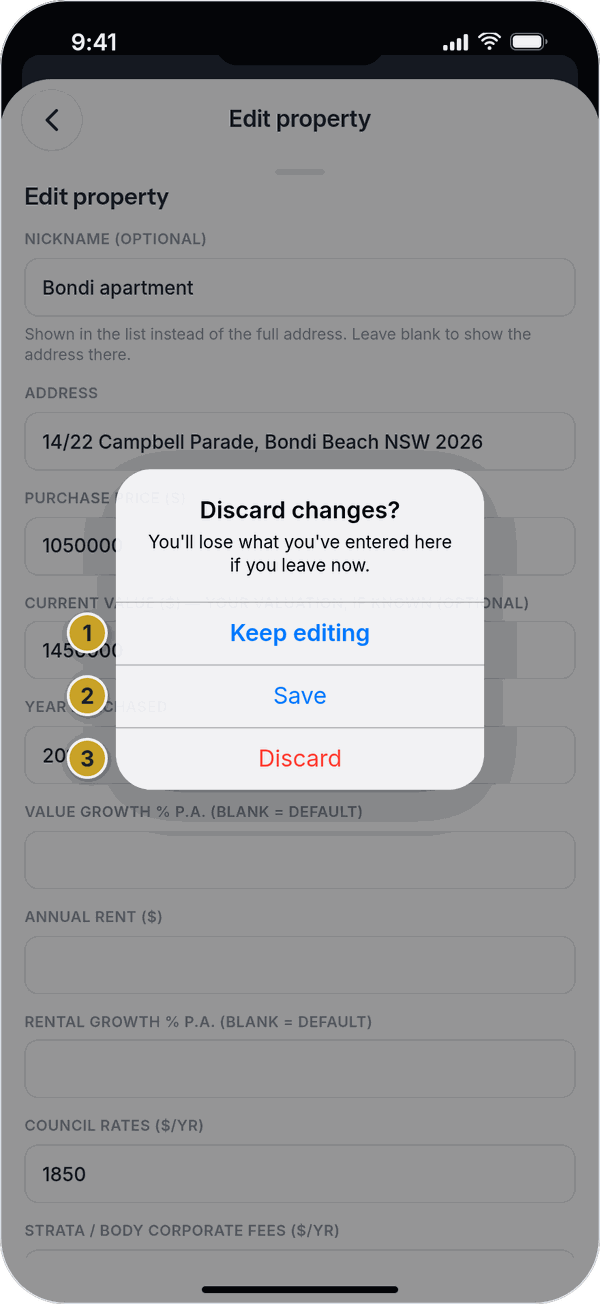 Discard changes promptKeep editingSaveDiscard
Undo
If you delete something by mistake, a message appears at the bottom of the screen for a few seconds with an Undo button — tap it to bring the entry straight back.
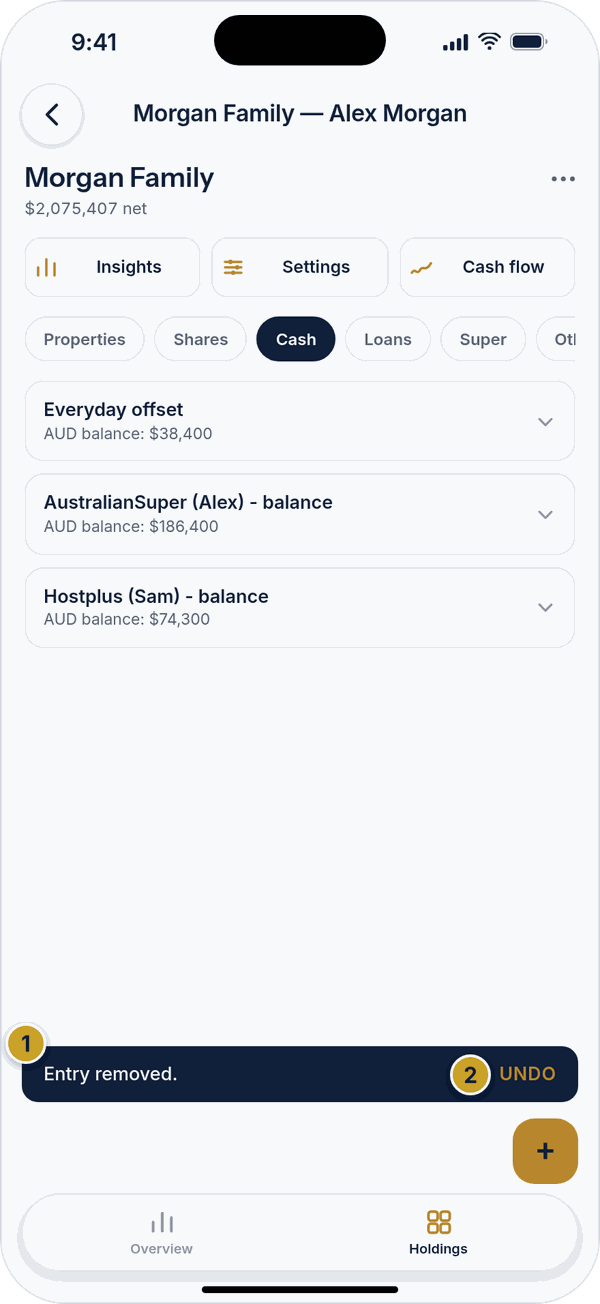 Undo after deleting an entryMessageUndo button
Profiles and the household total
Some wealth files hold more than one profile, for example you and a partner, or a family trust or SMSF. When a file has profiles, a Profile bar appears above the file. Tap it to switch profile, or to Add profile, Rename or Delete one. Viewers can switch profiles but can't change them. Every tab, chart and report then shows the profile you picked. The choice is remembered on this phone only, so it won't change what someone else sees.
With more than one profile, a Household total card at the top of Overview combines them all, with a row for each profile. Tap a row to switch to that profile. Your Home and Files lists show the household total for these files, and an exported report adds a household summary page followed by a page for each profile.
The file menu
Tap the ⋯ button at the top right of a file for its other options: Settings, Export report, Past exports, Notes, Manage access and Delete wealth file. Each is covered in the sections that follow.
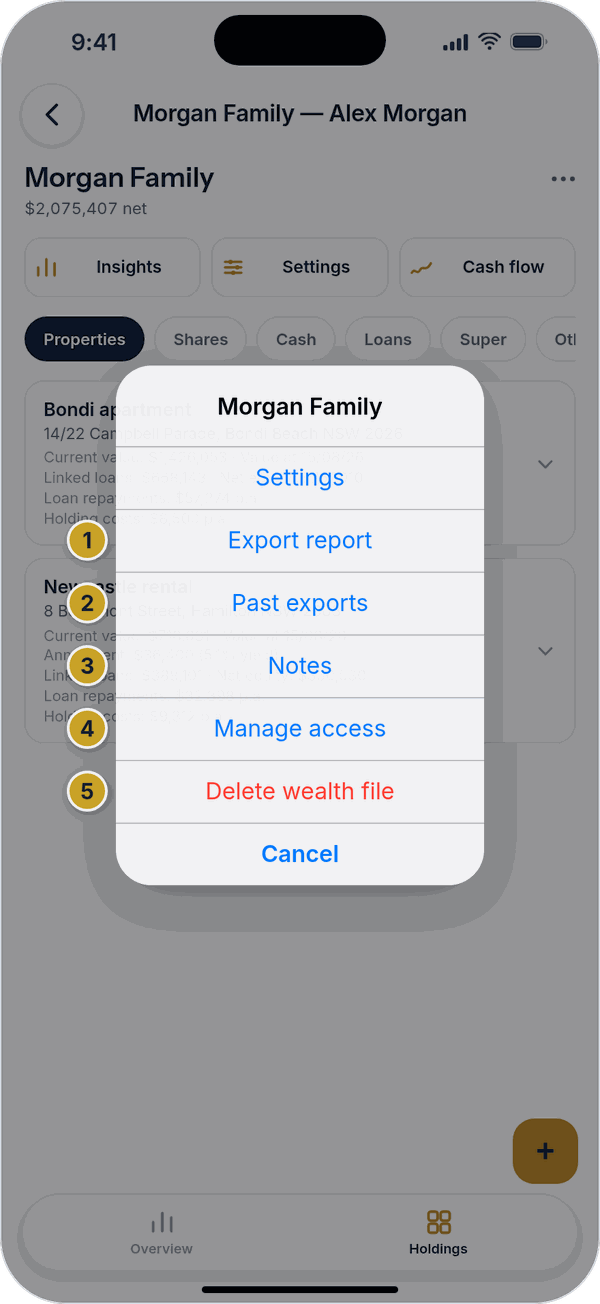 The file menuExport reportPast exportsNotesManage accessDelete wealth file
6. Adding and editing entries
Every category uses the same basic form — a list of fields with clear labels, a Save changes button at the bottom, and, when editing an existing entry, a Delete button too. Fields marked "optional" or "blank = default" can be left empty. Shares and crypto holdings also get a Refresh live price button, and a search option if a ticker symbol can't be matched automatically.
What each category actually asks for:
Properties
- Nickname and address
- Purchase price and year purchased
- Current value (your own valuation, if you know it) and its growth rate
- Annual rent and its growth rate
- Council rates, strata/body corporate fees, insurance, maintenance, and management fees
- State/territory and land value, for the land tax estimate — plus a "primary residence" toggle, which is exempt
- Which super fund it belongs to (if any), and a beneficiary note
Shares
- Ticker symbol (used to look up a live price) and quantity held
- Current price per unit — refreshed automatically, or set your own
- Year acquired, annual dividend per unit, franking percentage, and average cost per unit (for CGT)
- Growth rate, super fund, and beneficiary
Cash
- Account name and current balance, plus currency and exchange rate if it's not in AUD
- A start year and starting balance, so the real growth rate to today can be worked out automatically — or a manual growth rate if you'd rather set that yourself
- An interest rate, shown on the Cash flow screen
- Super fund and beneficiary
Loans
- Loan name and original amount
- Interest rate, start year, and term — with these three set, the balance owing today and your annual repayment are both calculated automatically
- An interest-only toggle, and a residual/balloon amount if relevant
- What the loan is linked to (a property or other asset), and its super fund
Super
- Fund name
- Fund type — industry, retail, or self-managed (SMSF)
A super fund's own balance comes from whatever you tag to it elsewhere (properties, shares, cash, and so on) — see "Viewing an entry" above.
Other assets
- Asset name and category (private equity, business interest, collectibles, art, crypto, or other)
- Value, currency and exchange rate
- Start year and growth rate, to project the value forward from that year
- Super fund and beneficiary
Crypto
- Ticker symbol and name, and quantity held
- Current price — refreshed automatically, or set your own
- Purchase date and price per unit
- Growth rate, super fund, and beneficiary
Income
- Income name
- Type — salary, consulting, or self-employed
- Annual amount, after tax
Goals
- Goal name
- Target net wealth and target year
Insurance
- Type — life, TPD, income protection, trauma, or other
- Sum insured and annual premium
7. Wealth file Settings
Open a wealth file and tap the Settings quick-action button (or ⋯ → Settings) to reach it. Everything here saves automatically as you change it, except Legacy contact, which has its own explicit save button. A "Saved" note at the top confirms it.
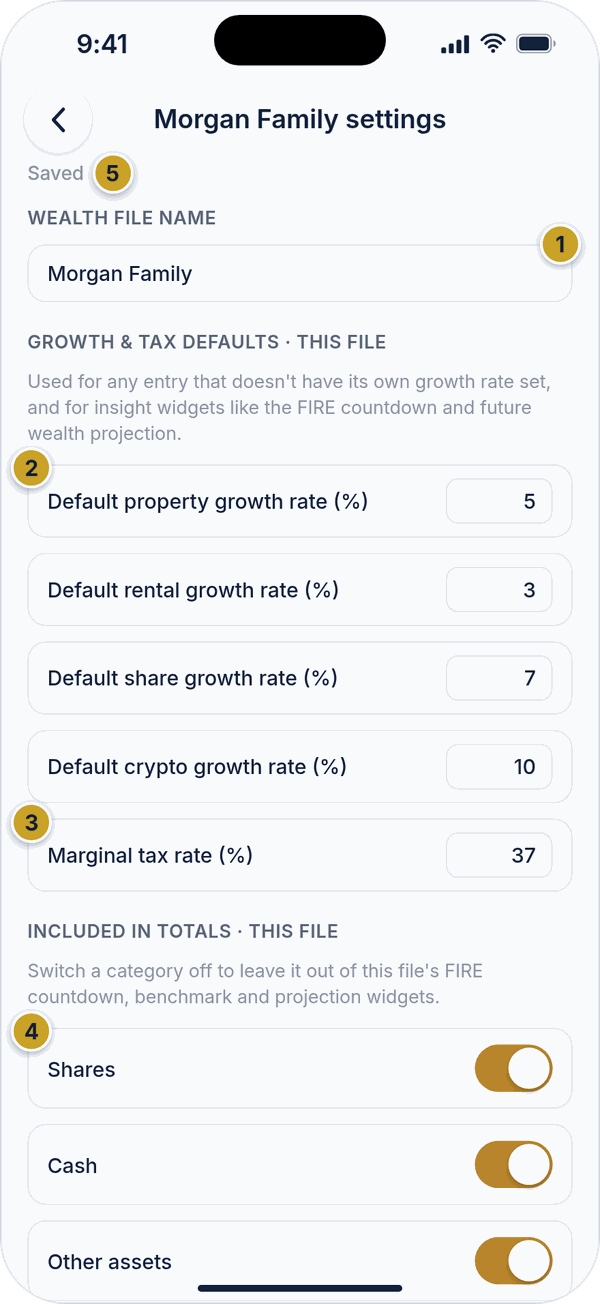 Wealth file Settings, topWealth file name (renames the file)Default growth rates for this fileMarginal tax rateIncluded-in-totals switchesSaved status
- Wealth file name — rename the file here.
- Growth & tax defaults — the property, rental, share and crypto growth rates, and the marginal tax rate, used for any entry that doesn't set its own.
- Included in totals — switch a category off to leave it out of this file's Insights widgets.
- Who has access — everyone on the file, with their role. Owners and managers can revoke someone here.
- Weekly summary email — get this file's net worth emailed to you once a week (owner only).
- Legacy contact — if you go quiet for a while, we'll check in, then send this person a read-only snapshot of the file (owner only). Nothing is sent unless the check-in goes unanswered.
- Display — choose which of the ten category tabs show and in what order, plus which Insights widgets appear. This applies to every wealth file you own, not just this one.
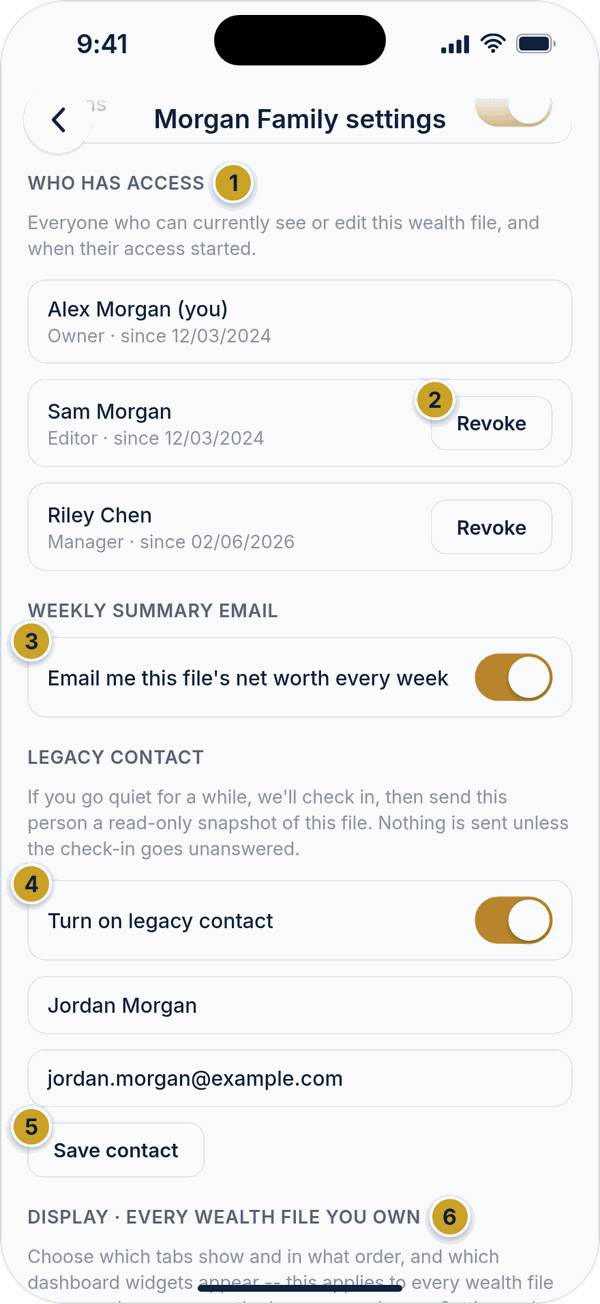 Wealth file Settings, access and displayWho has access listRevoke buttonWeekly summary email switchLegacy contact switch and detailsSave contact buttonDisplay section (tab order and visibility)
8. Insights
Tap the Insights quick-action button on an open wealth file to see a set of estimate widgets built from that file's data: Tools (calculators), an asset breakdown, a net worth benchmark against others your age, a FIRE countdown, a future wealth projection, retirement drawdown, an estimated land tax figure and a net worth history chart. Tap a card to open it. Turn individual widgets on or off from the Display section of the file's Settings screen.
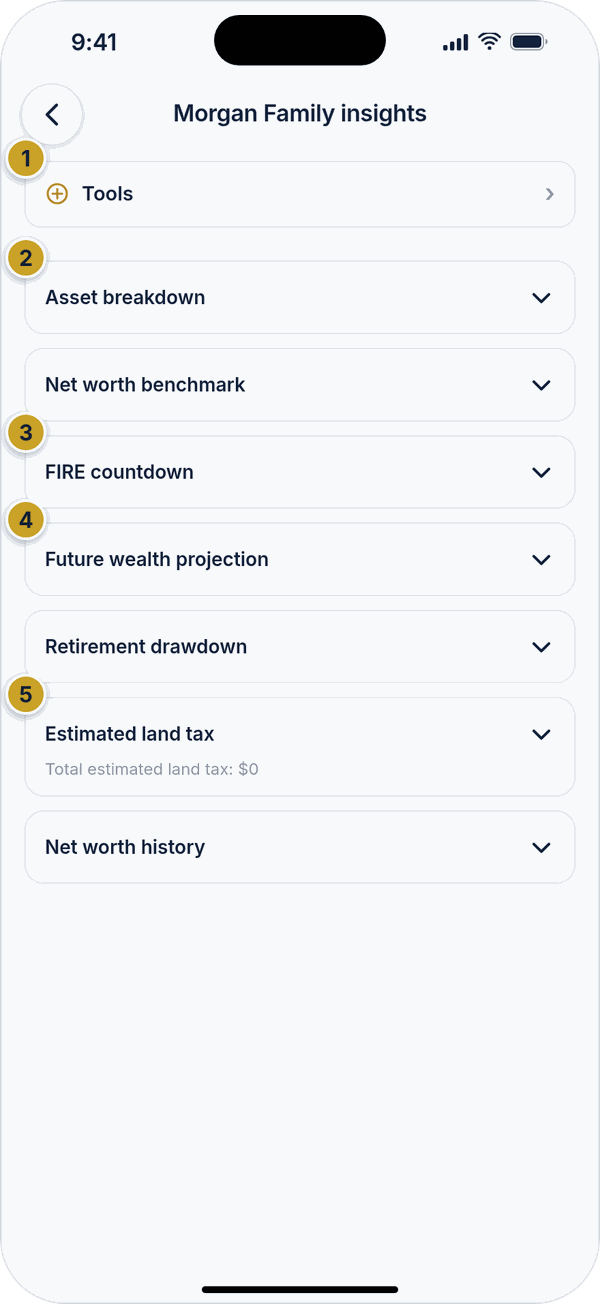 InsightsTools buttonAsset breakdown cardFIRE countdown cardFuture wealth projection cardEstimated land tax card
Every figure here is a general estimate based on what you've entered — not financial, tax, or legal advice. See the Terms & Conditions for the full disclaimer.
9. Cash flow
Tap the Cash flow quick-action button to see your money moving in and out over a year: rent, dividends, interest, salary and consulting income, minus loan repayments and property holding costs, for a net income figure, followed by a five-year projection of available income. Properties and shares each get their own breakdown showing their individual yield. An estimated negative-gearing tax benefit is also shown here — this one figure is only available on the Advanced plan.
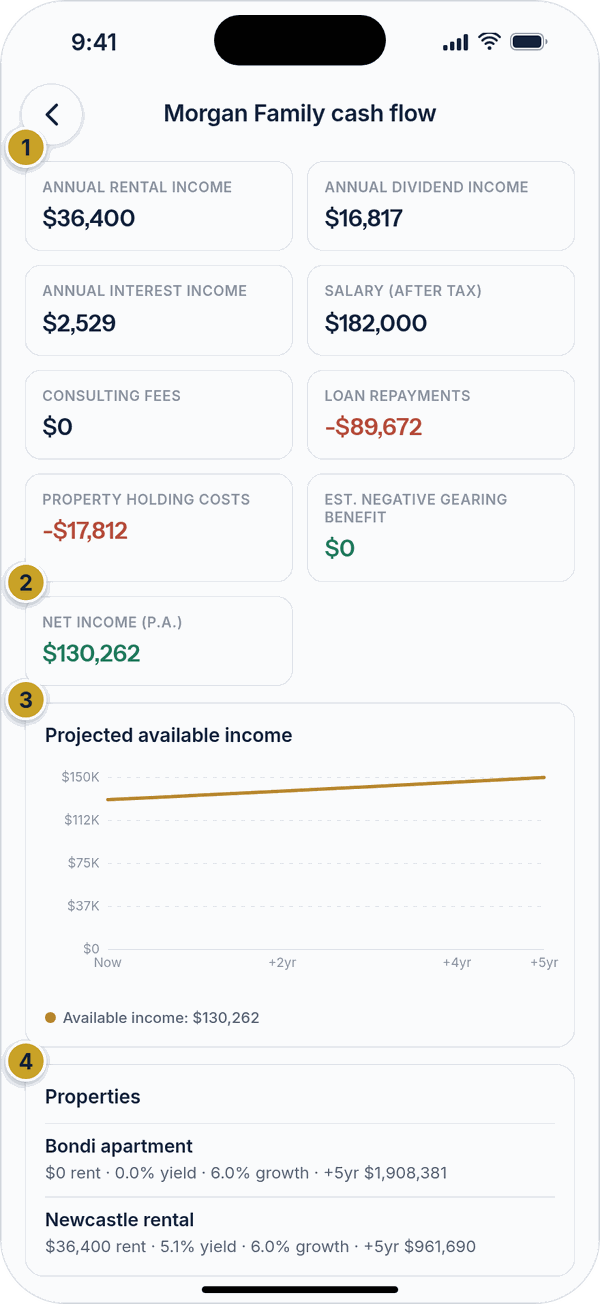 Cash flowIncome and cost tilesNet income tileProjected available income chartProperties table
10. Sharing a wealth file
Open a file, tap ⋯ → Manage access (owner or manager only), and you'll see everyone who currently has access, plus an invite form.
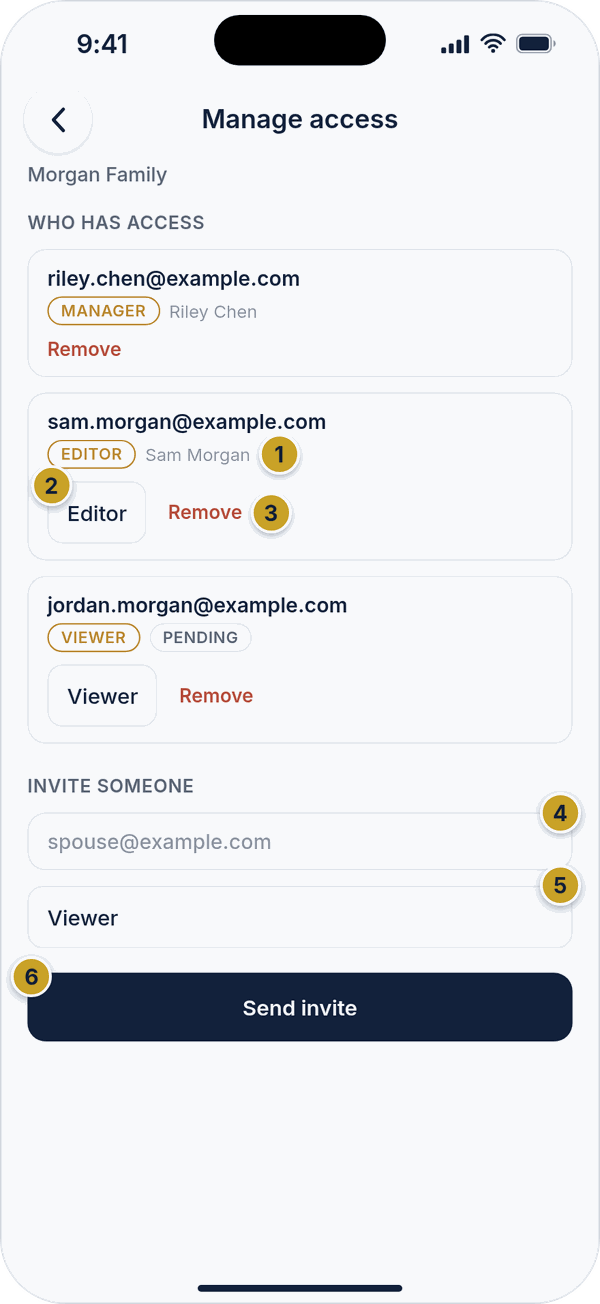 Manage accessRole and Pending markerRole pickerRemoveInvite email fieldRole for the invitationSend invite
- Owner — full control, including deleting the file and changing owner-only settings.
- Manager — can edit entries and manage who else has access.
- Editor — can view and edit entries, but can't manage sharing or delete the file.
- Viewer — read-only access.
To invite someone, enter their email, choose Editor or Viewer, and tap Send invite. The invitation shows as Pending until they accept. To change someone's role, use the role picker beside their name; to remove their access, tap Remove.
11. Notes
Open a file and tap ⋯ → Notes to keep a running, timestamped log of anything worth remembering about this file — a valuation you got, a decision you made, anything at all. Type a note and tap Add note. Notes show who wrote them and when, and can be removed if you have permission to.
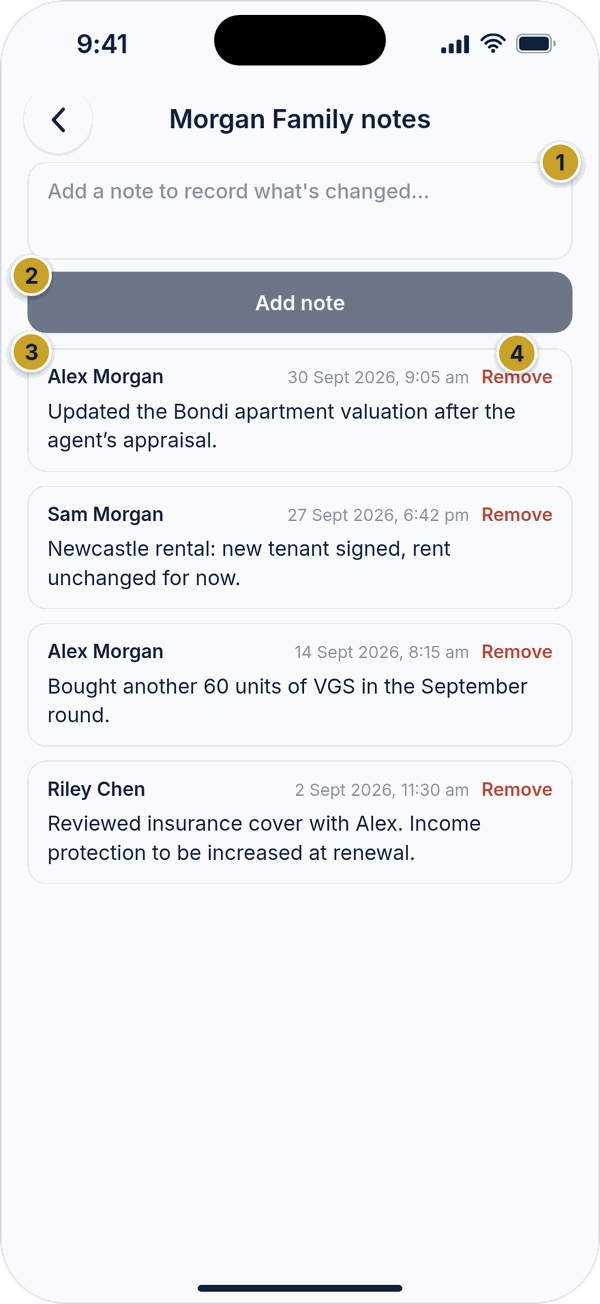 NotesNote boxAdd note buttonA saved noteRemove
12. Exporting a report
Tap ⋯ → Export report and choose Full report (a complete summary of the file) or Lender statement (a tidier view for a bank or broker). The report is made as a PDF you can preview and share.
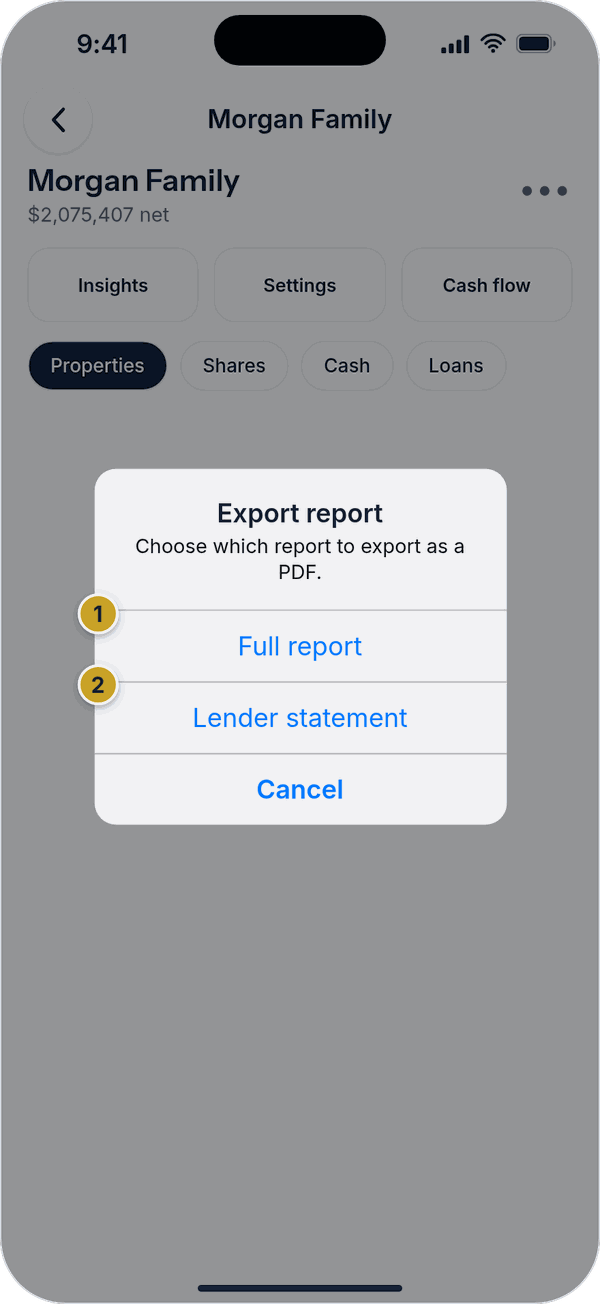 Export reportFull reportLender statement
Reports you've made are kept on your phone under ⋯ → Past exports, so you can open or share one again. Tap Remove to delete the saved copy — this only removes it from your phone, not your wealth file.
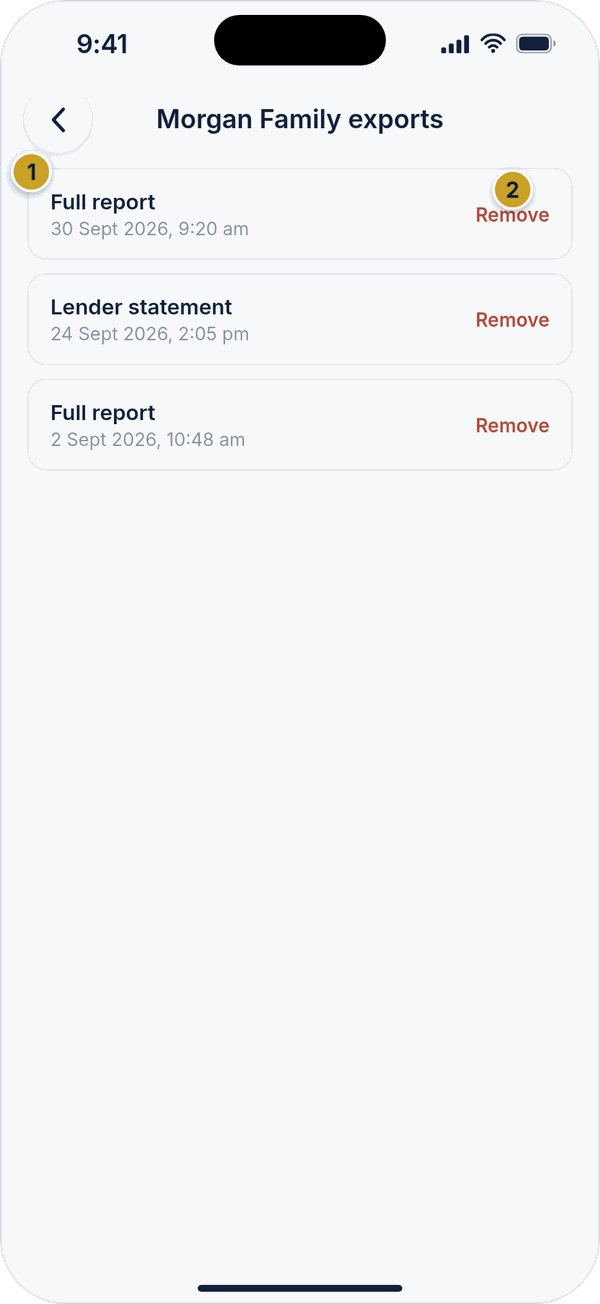 Past exportsA saved export (tap to open the PDF)Remove
13. Settings tab, account & security
The Settings tab (bottom navigation) shows who you're signed in as and holds your appearance, language, plan and security settings.
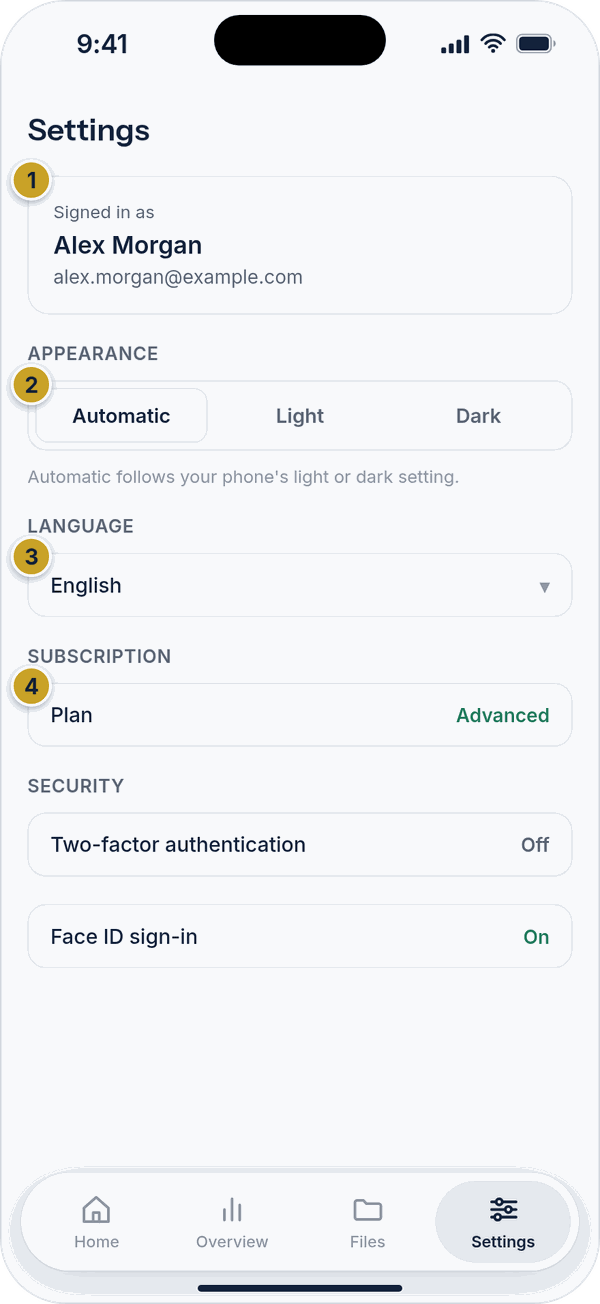 Settings tabSigned in as cardAppearance: Automatic, Light or DarkLanguage rowPlan row
Appearance and language
Under Appearance, choose Automatic (follows your phone), Light or Dark. Tap Language to open the list and pick one of Automatic, English, Chinese, Vietnamese, Arabic, Hindi, French, German or Spanish. The whole app switches straight away, and so does this guide.
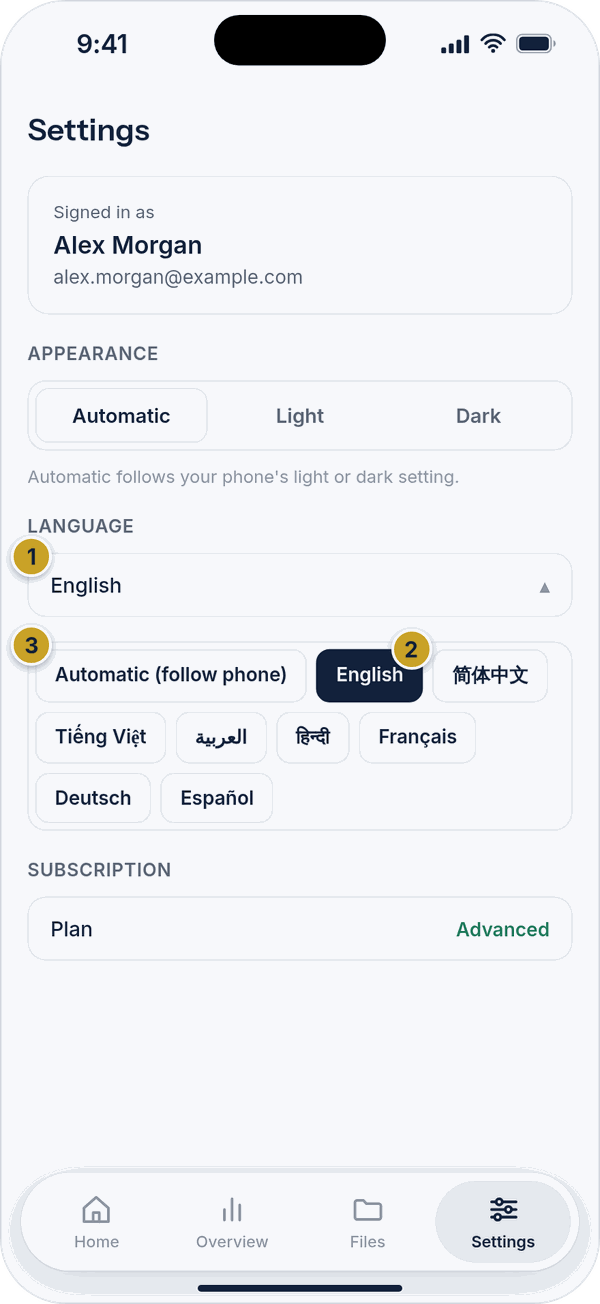 Language listLanguage rowCurrent languageLanguage choices
Security and support
Two-factor authentication and Face ID sign-in live under Security. Under Support you'll find Help (this guide), Contact Us, the Terms & Conditions and the Privacy Policy.
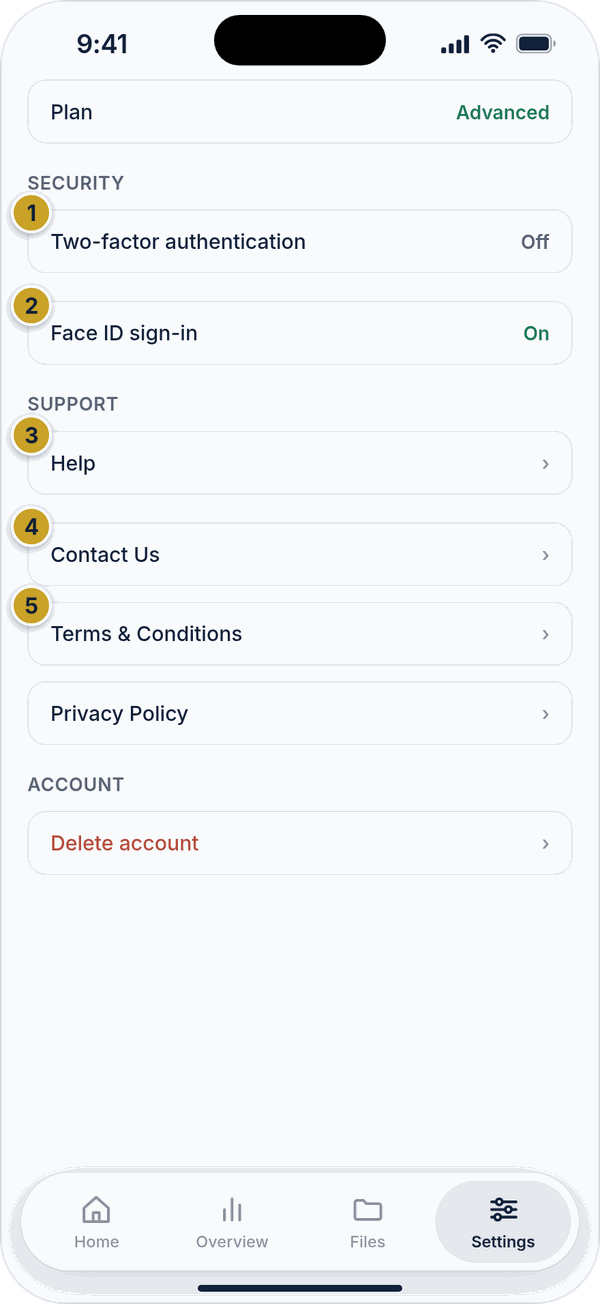 Security and supportTwo-factor authentication rowFace ID sign-in rowHelpContact UsTerms & Conditions and Privacy Policy
Two-factor authentication
Tap Two-factor authentication to turn it on. Scan the QR code shown with an authenticator app (Google Authenticator, Authy, or similar) — or enter the code underneath it by hand if you can't scan — then enter the 6-digit code it gives you and tap Verify and enable. You'll then be shown a set of one-time backup codes; save or share them somewhere safe, since they're only ever shown once and are the only way back in if you lose access to your authenticator app.
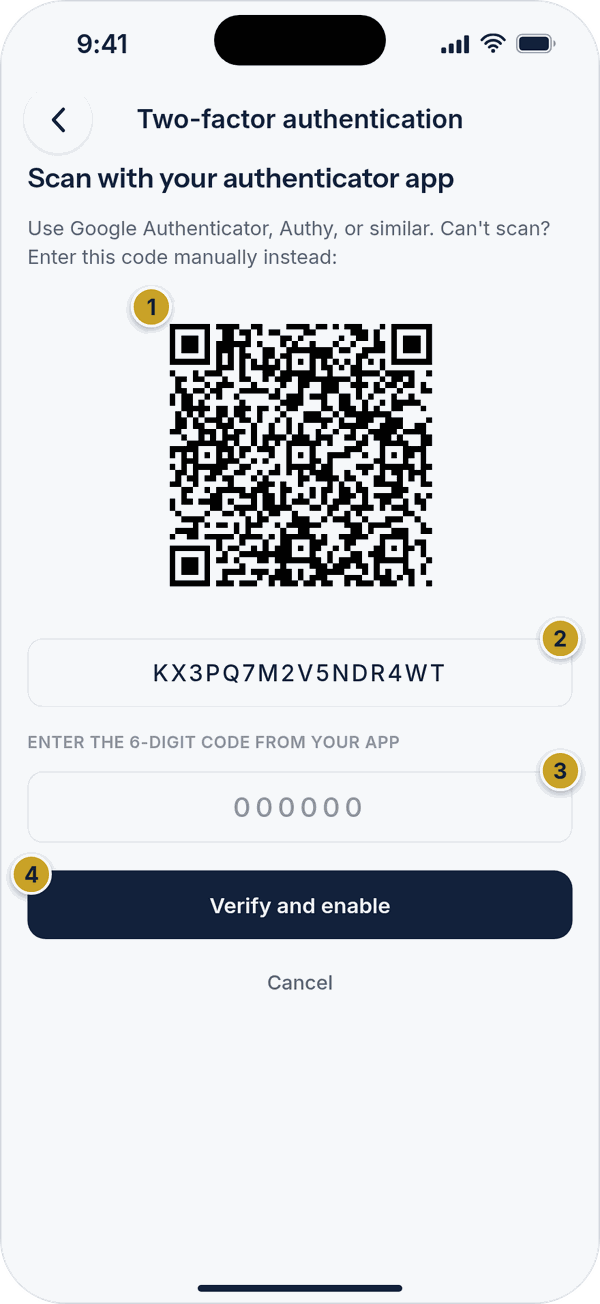 Setting up two-factor authenticationQR code to scanManual code6-digit code fieldVerify and enable
Once it's on, you can view a fresh set of backup codes or turn two-factor authentication off again at any time — both ask you to re-enter your password first.
Face ID sign-in
Face ID sign-in lets you sign in with your face instead of typing your password. After you sign in with your password, the app offers to enable Face ID for next time. You can turn it off at any time with the Face ID sign-in switch in Settings; to turn it back on, sign out and sign in again with your password and you'll be offered Face ID right after.
Signing out, the server address and the app version
At the bottom of Settings you'll find Delete account (see section 16), the Server address with a Change link, Sign out and the app's version and build number. The Server setting is a development setting used while the app is being tested, and isn't something you need to change. Tap Sign out and you'll be asked to confirm, with an optional star rating for your experience — rating is entirely optional and never required.
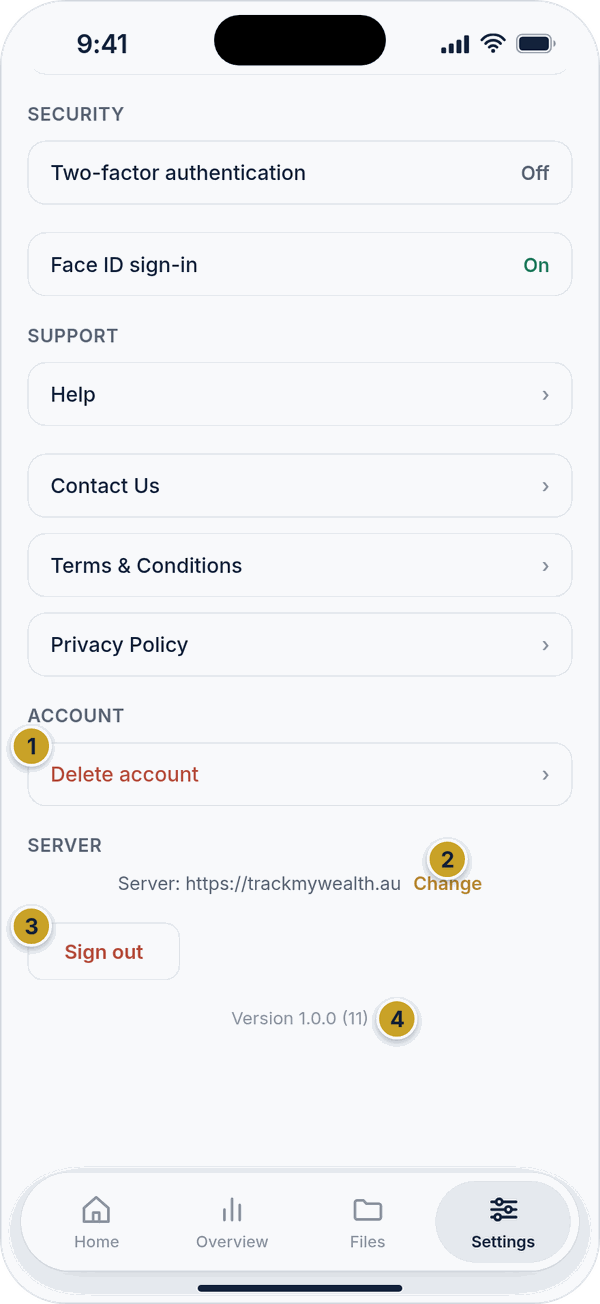 Account, server and sign outDelete accountServer address and Change linkSign outApp version and build
Changing your password or profile
These aren't editable from the app yet. To change your password, use Forgot password? on the sign-in screen. To change your name or other profile details, sign in to the browser app at trackmywealth.au.
14. Plans and subscriptions
Track My Wealth has three plans. Starter is free. Advanced adds Australian tax and scenario tools on top of Starter. Client Manager adds everything in Advanced plus client management. Your current plan is shown on the Plan row under Subscription in Settings — tap it to see your plan or to upgrade.
Both paid plans include a 14-day free trial. A card is required to start, but you won't be charged until the trial ends, and you can cancel any time before then. Use the Monthly and Annual buttons at the top to choose how you're billed — Annual gives you two months free. The price for your choice is shown on each plan card.
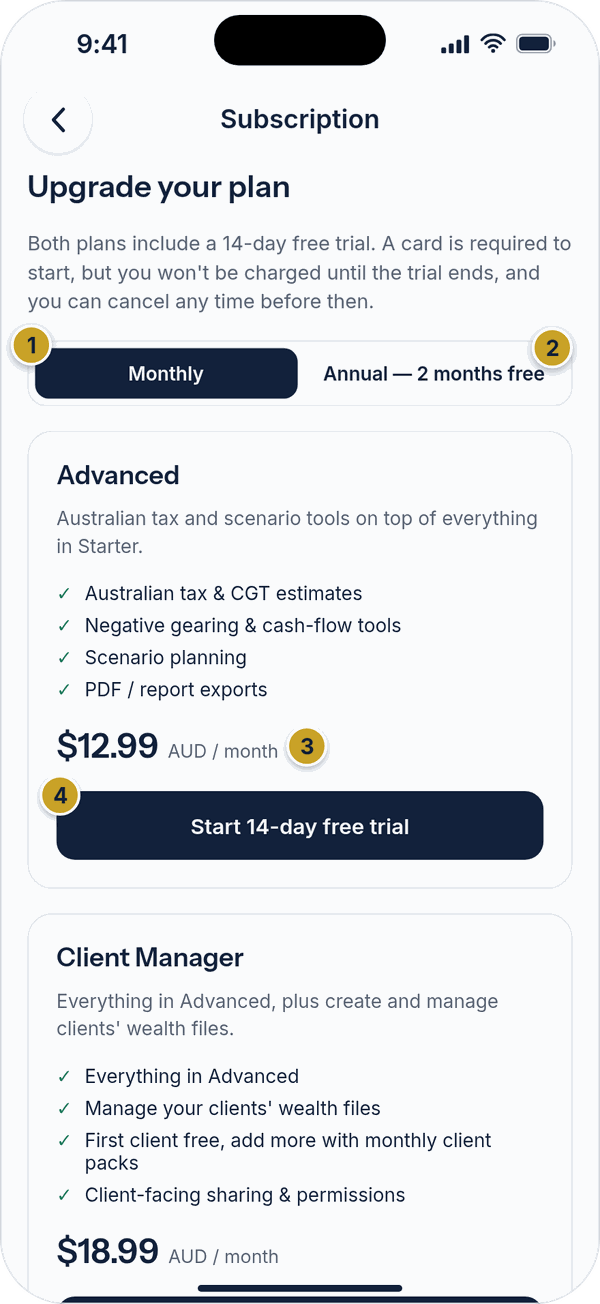 Upgrade your planMonthly (selected)Annual, 2 months freePrice for the chosen billing periodStart 14-day free trial
Further down you'll find the Client Manager card, a Restore purchases button (for getting your plan back after reinstalling the app or changing phone) and the renewal notice with links to the Terms of Use and Privacy Policy. Subscriptions renew automatically unless you cancel at least 24 hours before the end of the current period.
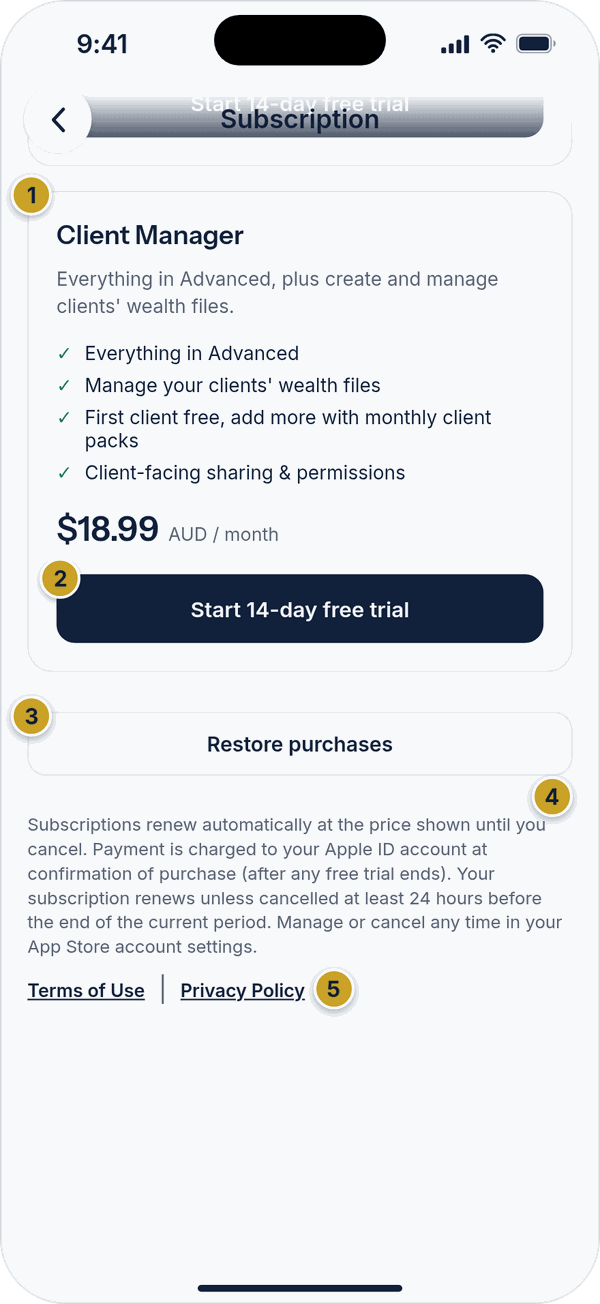 Client Manager planClient Manager plan cardStart 14-day free trialRestore purchasesAuto-renewal and cancellation noticeTerms of Use and Privacy Policy links
If you already have a plan
The Plan screen shows your plan, its status, your next renewal date and how you're billed. If you subscribed through the App Store or Google Play, tap Manage in App Store (or Google Play) to change or cancel — Apple and Google handle that, not us.
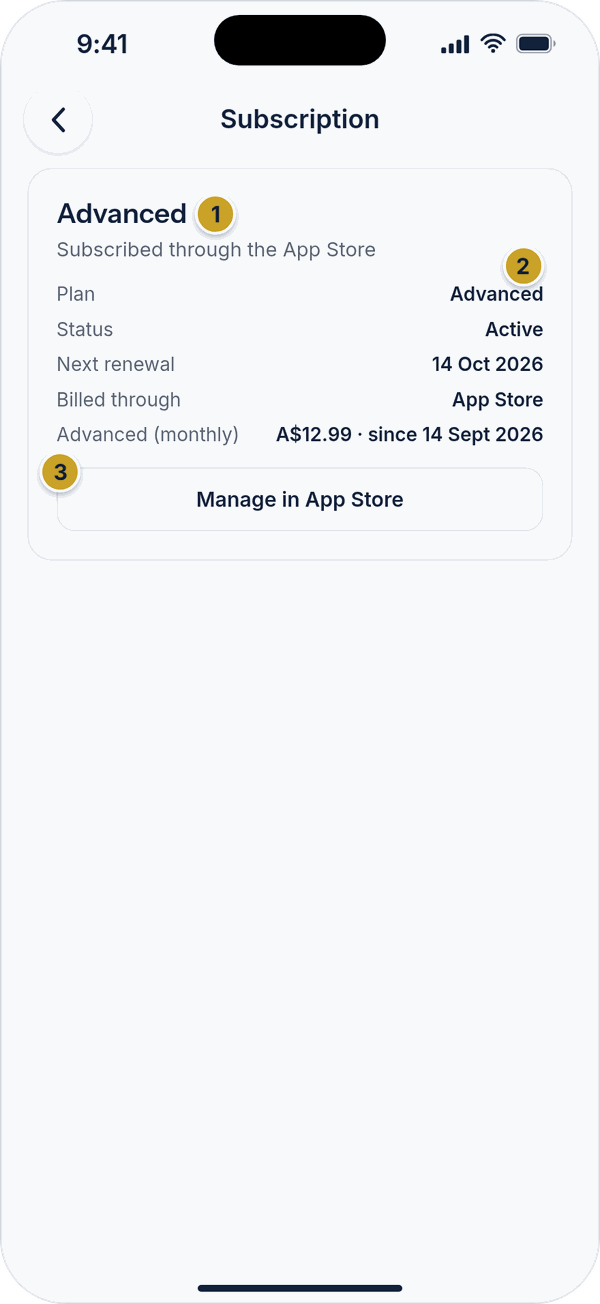 Your subscriptionYour plan and how you are billedPlan detailsManage in App Store
If your account has been given complimentary access, the Plan screen says so and shows no renewal or billing details — there's nothing to pay or cancel.
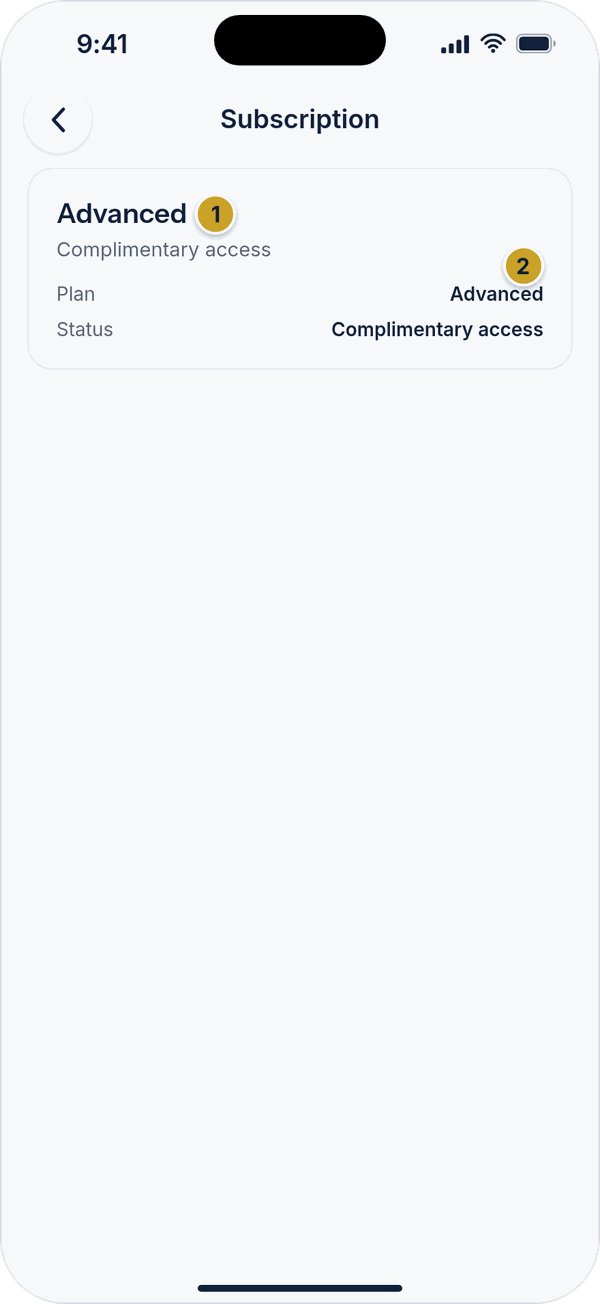 Complimentary accessPlan and complimentary access notePlan details
15. For power users and managers
If your account manages other people's finances, tap + Create client from Home or Files to set up a brand-new client in one step — their account and their first wealth file are both created together. Enter their name and email and a temporary password, then tap Create client. Share the temporary password with them another way (phone or in person) — they can change it once they're in. Adding clients needs the Client Manager plan; if you don't have it yet, View plans takes you to the upgrade screen.
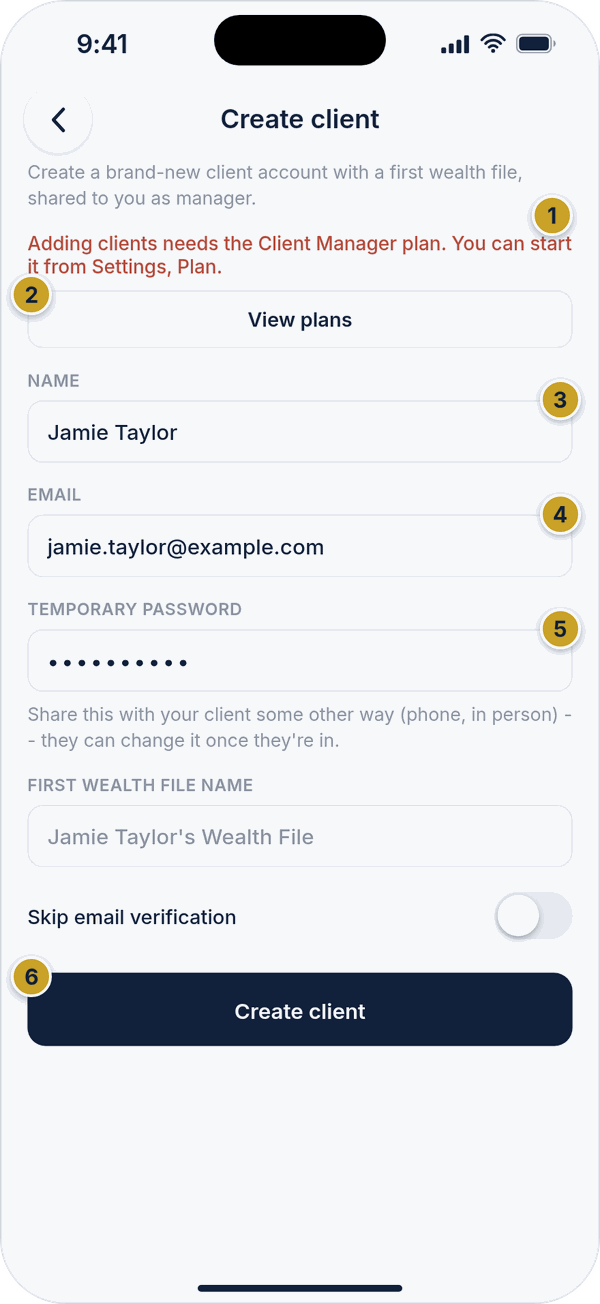 Create clientPlan-needed messageView plans buttonClient nameClient emailTemporary passwordCreate client button
Your plan includes some client slots; the Add client capacity screen shows how many you've used and offers capacity packs to add more, each billed monthly and renewing automatically until cancelled. Tap Buy on the pack you want, or Restore purchases if you've bought one before.
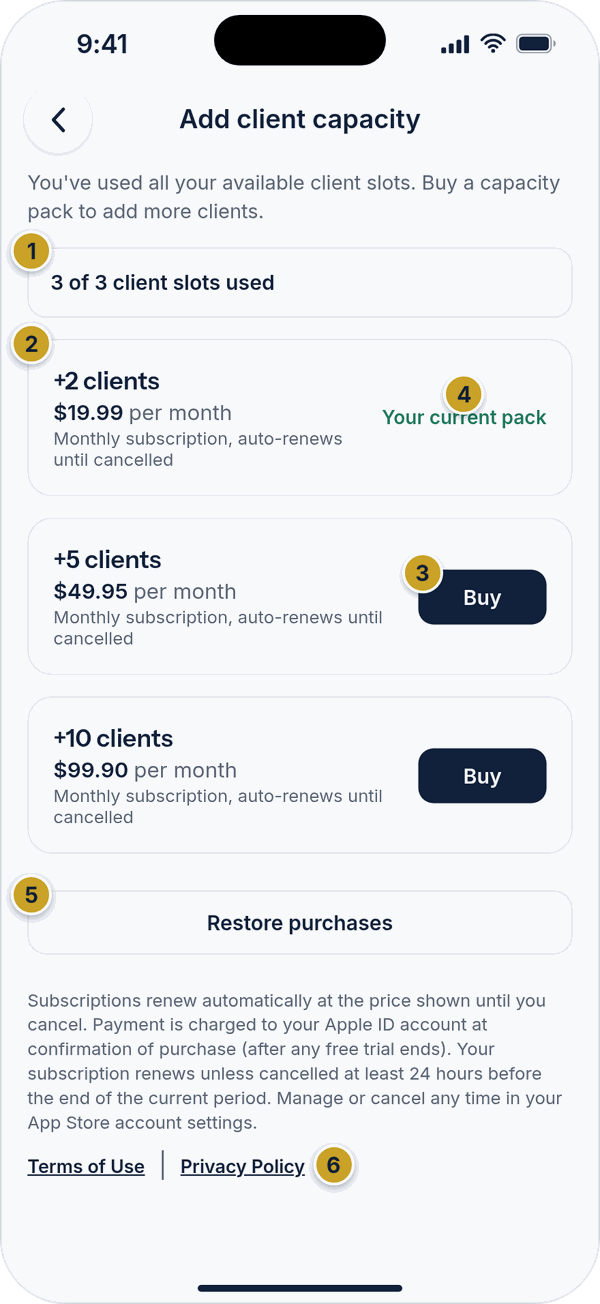 Add client capacityClient slots usedA capacity pack with its monthly priceBuy buttonYour current packRestore purchasesRenewal notice
16. Deleting your account
To delete your account, go to Settings → Delete account. The screen lists what will be deleted, including the wealth files you own.
- If you subscribed through the App Store or Google Play, cancel that subscription first — deleting your account does not cancel it, and you may keep being charged.
- To confirm, enter your password and type DELETE, then tap Permanently delete my account.
- We keep a recoverable copy for 30 days. If you change your mind, email info@vergetec.au within that time and we can restore it. After that it is permanently erased.
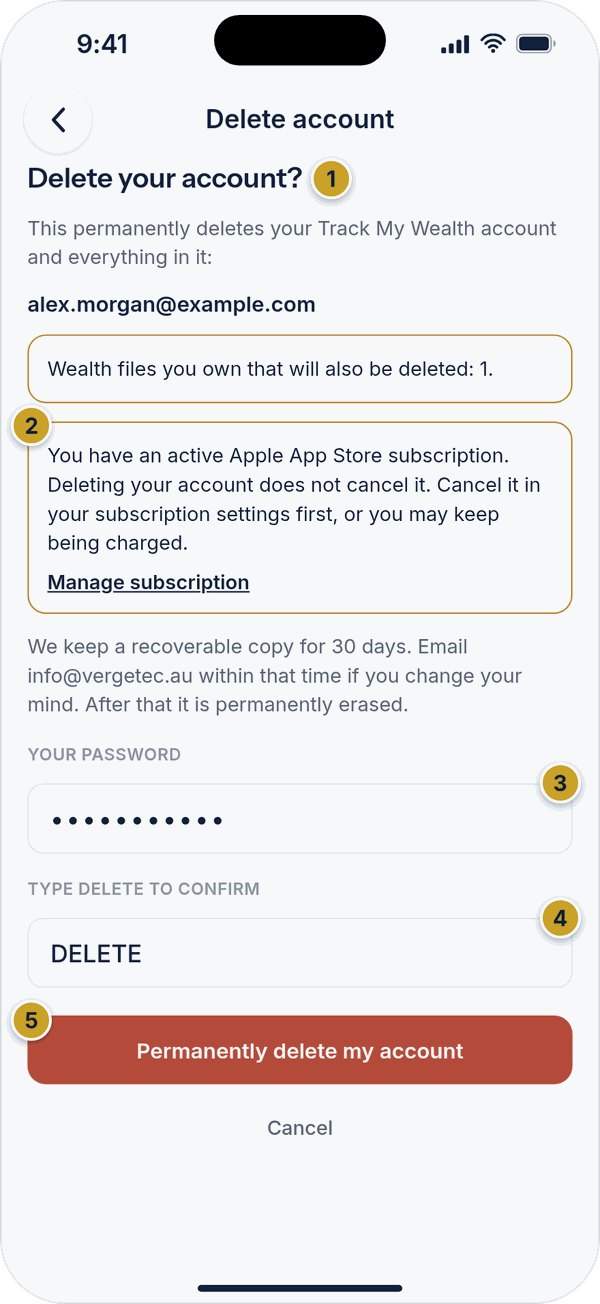 Delete accountWhat will be deletedStore subscription warningYour passwordType DELETE to confirmPermanently delete my account
17. Getting more help
If anything in the app doesn't match this guide, or you run into a problem, tap Contact Us in Settings to send us a message, or email info@vergetec.au. If your access was set up by a Verge Technologies account administrator, they can help too.